
If you are developing a folding carton — the paperboard box behind most skincare jars, lipstick tubes, supplement bottles, and small retail goods — one of the earliest structural decisions is also one of the least discussed: how the box closes. The two closures that dominate this category are straight tuck and reverse tuck. On a retail shelf they can look almost identical, but they differ in board waste, unit cost at volume, front-panel cleanliness, and how they behave on a packing line.
This guide explains the difference the way a manufacturer sees it, so you can lock the structure before artwork, dielines, and tooling are finalized. It is written for buyers sourcing custom cosmetic packaging and other retail folding cartons — the product category where this decision comes up most often.
The Short Answer
Choose straight tuck if the box will face shoppers on a retail shelf or in product photography, and you want one perfectly clean front panel with no tuck slit interrupting the design.
Choose reverse tuck if you are ordering at volume and unit cost is the deciding factor. The carton blanks nest more tightly on the press sheet, which means less board waste per thousand boxes — and that saving compounds as quantities grow.
Both closures use the same paperboard, the same tuck-and-dust-flap mechanics, and comparable assembly effort. The differences are in sheet utilization, panel layout, and presentation — which is what the rest of this guide covers.
What “Straight Tuck” and “Reverse Tuck” Actually Mean
A folding carton is a single sheet of paperboard, die-cut, scored, folded, and glued along one side seam (the manufacturer’s joint). The top and bottom close with tuck flaps: small side flaps called dust flaps fold in first, then the main tuck flap folds over them and tucks into the box. Friction holds the closure — no glue, no tape.
The difference between the two styles is simply which direction the tucks fold:
- Straight tuck end (STE): the top tucks and the bottom tucks fold in the same direction. Both tuck openings end up on the back panel. The front panel is one continuous, uninterrupted surface.
- Reverse tuck end (RTE): the top tucks fold one way and the bottom tucks fold the opposite way. One tuck opening sits on the front panel, the other on the back.
One important boundary: this is the folding carton family — thin paperboard boxes for retail products. Corrugated custom mailer boxes use a different closure family altogether (roll-end-tuck-front, tuck-top, and similar heavy-duty designs), because corrugated board is thicker and ships differently. If your product ships direct-to-consumer in a protective outer box, that is a separate structural decision.
Front Panel and Shelf Presentation: Where Buyers Notice the Difference
This is the factor most buyers underestimate, and it is the main reason straight tuck exists.
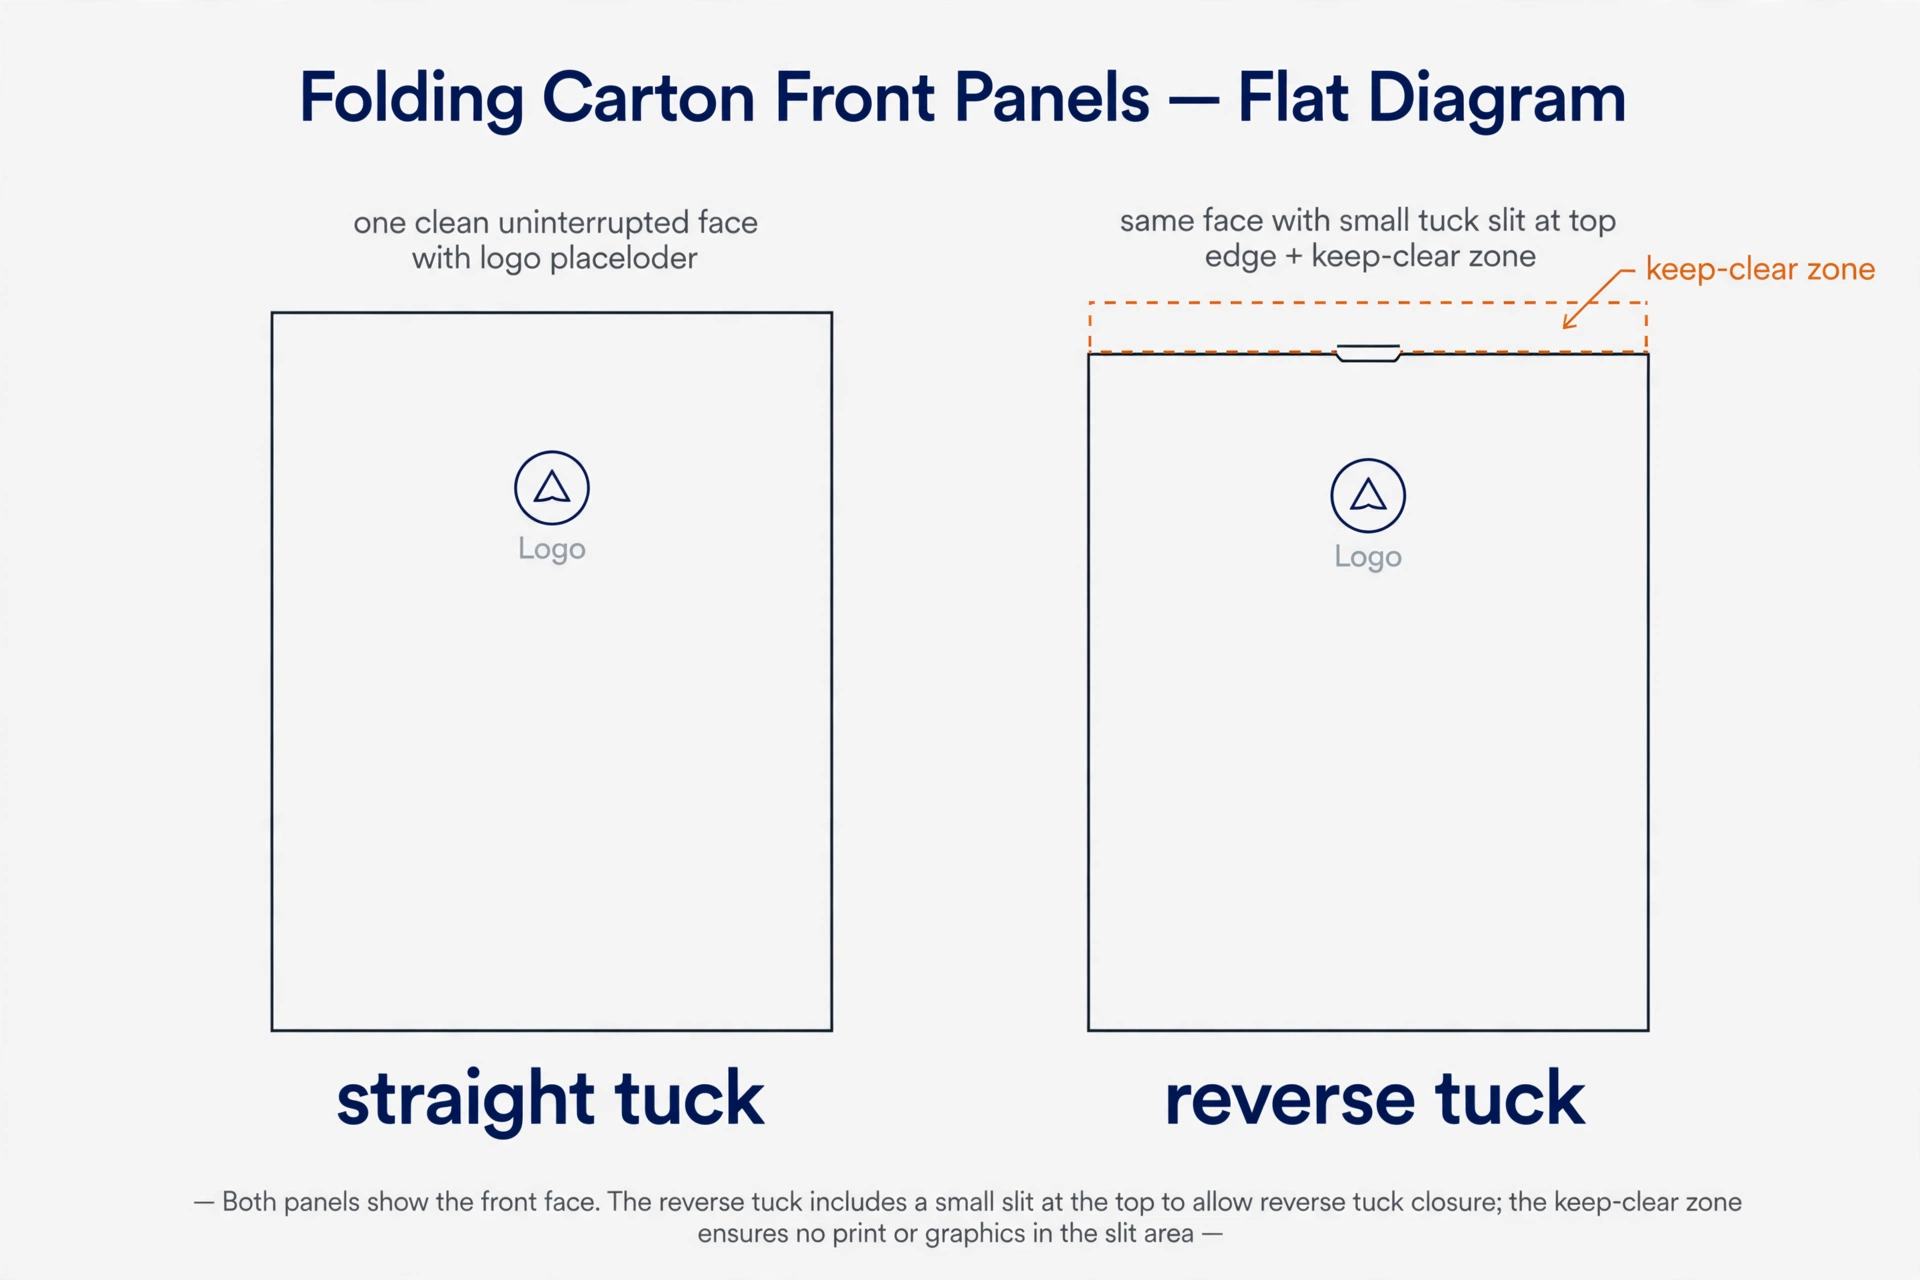
On a straight tuck carton, the front panel has no slit, no tuck edge, no interruption. Your hero product shot, brand mark, or key claim sits on a perfectly flat face. For beauty-counter display, retail shelf facing, and e-commerce listing photography, that clean face reads as more considered — and it photographs without the tuck line catching light or shadow.
On a reverse tuck carton, the front panel carries one tuck slit (at the top or bottom, depending on orientation). Most shoppers will never consciously notice it — millions of mass-market cartons use reverse tuck. But up close, or in a macro product photo, the slit is visible, and it constrains where you can place fine typography and small graphic elements.
Practical artwork rule for both: keep logos, regulatory text, and small type clear of tuck slits, score lines, and the glued side seam. Your manufacturer should supply the dieline before you lock artwork — design to the dieline, not to a blank rectangle.
Cost: Why Reverse Tuck Usually Costs Less at Volume
Buyers often assume the price difference comes from material or labor. In practice, the driver is sheet utilization — how many carton blanks fit on one press sheet.
Reverse tuck blanks interlock. Because the top and bottom tucks point in opposite directions, the blanks nest together on the sheet like a zipper, leaving narrow waste strips between them. Straight tuck blanks need more spacing around each tuck flap, so fewer cartons fit per sheet and more board goes to trim waste.
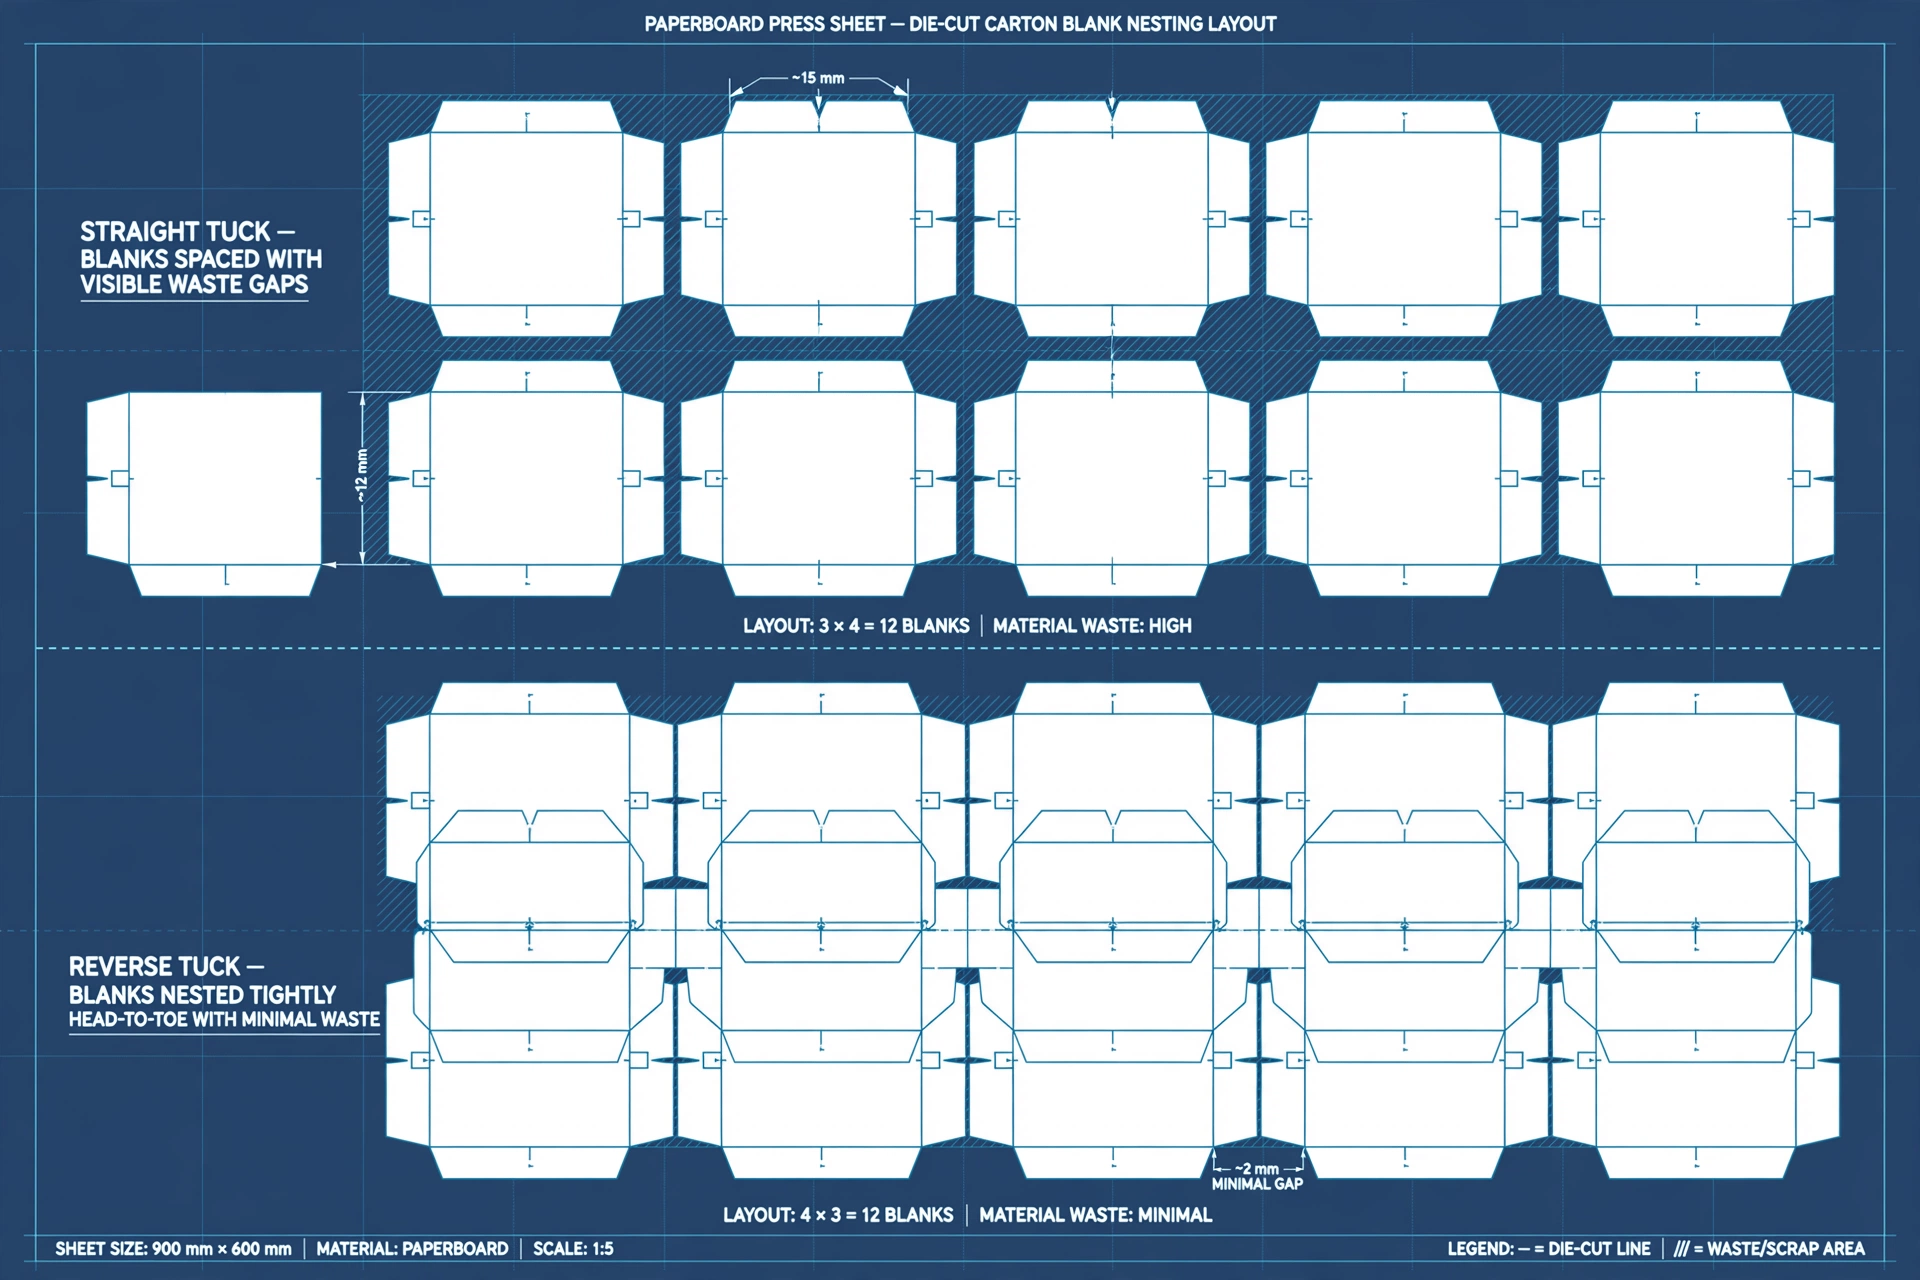
What this means in practice:
- At small quantities, the per-unit difference is modest. Setup costs — dies, plates, machine make-ready — are fixed per design and dominate the unit price. The waste gap exists but barely registers.
- At tens of thousands of units, the waste gap compounds. Every sheet yields more cartons with reverse tuck, and the saving shows up in the per-unit price.
- The honest framing: choose the substrate of savings carefully. If your design needs a clean front panel for retail, do not switch to reverse tuck purely to chase a small unit-cost saving — the presentation cost can outweigh the board saving. Choose the closure that fits the sales channel first, then optimize cost through quantity and efficient print planning.
No manufacturer can quote the exact gap without your dimensions and quantity, because nesting efficiency depends on how your specific blank fits the sheet. Any supplier giving you a flat percentage without the dieline is guessing.
Packing Lines: Hand Assembly vs Automatic Cartoning
For hand packing — common with product launches, small batches, and fulfillment handled by your own team — both closures are equally simple. Straight tuck is marginally more intuitive because both ends close with the same motion, but any packer learns either in minutes.
For automatic cartoning machines, both closures run on standard equipment. Reverse tuck is the more common specification on high-speed lines, largely because it dominates high-volume work. But the closure style is rarely what makes or breaks a machine run. What matters far more:
- Consistent, accurate scoring (a weak or misregistered score jams machines regardless of tuck style)
- Correct tuck flap length relative to box depth
- Board caliper matched to the machine’s tolerances
- A production trial with actual samples before the full run
If you use a co-packer, send them the dieline and a physical sample early and ask specifically about tuck compatibility. That one conversation prevents more line stoppages than any closure choice.
For heavier products, the tuck style is not the deciding factor at all. Tuck closures hold by friction, and a heavy glass jar will stress any tuck end. The real levers are board grade and bottom construction — a heavier paperboard, or an auto-lock (crash-lock) bottom instead of a tuck bottom, does more for load-bearing than switching between straight and reverse tuck.
Closure Security and Dust Resistance: An Honest Limitation
Tuck ends are not sealed closures. The flap tucks in by friction, which means the closure can gap slightly under pressure, and it is neither dust-proof nor tamper-evident. For most cosmetics, skincare, and dry retail goods this is a complete non-issue — the product inside has its own primary packaging (jar, tube, bottle).
But if your product or supply chain genuinely needs protection — dusty warehouses, long multi-leg freight, food-adjacent or hygiene-sensitive goods — say so in the specification. The solutions are an inner bag or pouch, a sealed-end carton construction, or a different box style entirely. A tuck closure chosen for the wrong protection requirement is a specification error, not a manufacturing defect. (For board and strength options, see our paper material guide.)
Artwork and Dieline: Which Panel Is the Front?
This is the most common pre-press mistake we see with tuck cartons, and it is entirely avoidable.
- Straight tuck: the panel without tuck slits is the front. Unambiguous.
- Reverse tuck: both panels carry a slit, so the “front” is a designation on the dieline, not something you can infer. Confirm it with your manufacturer before artwork is finalized — do not assume.
Additional artwork discipline for tuck cartons:
- Keep critical text and logos at least a few millimeters clear of every slit, score, and the glue flap.
- Remember that the inside of the carton is unprinted unless you specify it — factor that into unboxing designs.
- If color accuracy matters for the front panel, decide between CMYK or Pantone early, and proof on the actual board.
| Factor | Straight Tuck | Reverse Tuck |
|---|---|---|
| Front panel | One clean, uninterrupted face | Tuck slit on the front panel |
| Shelf presentation | Cleaner; suits premium and retail-facing brands | Fine for most goods; slit visible up close |
| Board waste per sheet | More trim waste | Blanks nest tighter — less waste |
| Unit cost at volume | Slightly higher | Slightly lower |
| Hand assembly | Intuitive; same motion both ends | Equally simple once shown |
| Automatic cartoning | Runs well | The common high-volume spec; confirm with co-packer |
| Best for | Cosmetics, skincare, fragrance, premium retail | High-volume runs, value lines, e-commerce cartons |
Buyer Checklist: Decide in 5 Questions
- Will the box face shoppers on a retail shelf or in close-up product photography? → Straight tuck.
- Is unit cost at 10,000+ units the deciding factor? → Reverse tuck.
- Does the design need a pristine front panel with no slit? → Straight tuck.
- Is the product heavy (glass jars, dense contents)? → Neither tuck style decides this — check board grade and consider an auto-lock bottom.
- Still unsure? → Get physical blanks of both, run them through your packing process, and hold them side by side. Structure decisions are settled faster in the hand than on screen.
How to Request an Accurate Quote
Tuck style is one line in a quote request, but suppliers price folding cartons accurately only with the full picture. Prepare:
- Box dimensions (length × width × height) and product weight
- Tuck style: straight, reverse, or “recommend based on artwork and quantity”
- Board/material and thickness (or ask for a recommendation)
- Printing: number of colors, CMYK or Pantone, outside only or inside too
- Finishing: lamination, foil, embossing, spot UV — or none
- Quantity per design
- Destination and preferred shipping terms
As a working reference: structural sampling typically takes 3–7 days, and bulk production runs 15–20 days after artwork and sample approval. Ask for a physical sample on the actual board before mass production — it is the only reliable way to check tuck fit, panel flatness, and color.
FAQ
Which is cheaper: straight tuck or reverse tuck?
Reverse tuck, at volume. The saving comes from tighter blank nesting on the press sheet, not from cheaper material. At small quantities the difference is modest because setup costs dominate.
Which looks better on a retail shelf?
Straight tuck. The uninterrupted front panel gives designers a clean face and photographs better. Reverse tuck is perfectly fine for most goods, but the slit is visible up close.
Can both run on automatic packing machines?
Yes. Both closures run on standard cartoning equipment. Machine compatibility depends more on scoring accuracy, flap dimensions, and board caliper than on tuck direction — confirm with your co-packer and trial with production samples.
Are tuck boxes strong enough for heavy products?
It depends on the board grade, not the tuck direction. Tuck closures hold by friction; for heavy contents, specify a heavier paperboard or switch the bottom to an auto-lock (crash-lock) construction.
Can I get samples of both before deciding?
Yes — and for a structure decision, you should. If you are unsure which sample to order before bulk production, start with a blank structural sample of each style to check fit, closure feel, and panel layout side by side. At Yingye Packaging, blank structural samples are free; you cover the courier fee.
Get a Quote for Your Folding Carton: Send us your box dimensions and product weight, your tuck preference — straight, reverse, or “recommend for us” — plus board/material, print colors, quantity, and destination. We will confirm the structure on a dieline and a physical sample before production, so the closure you approve is the closure you receive.