If you are creating custom packaging boxes, one of the most important files you will come across is the dieline. It may sound technical, but the idea is simple. A dieline is the flat layout that shows how packaging will be cut, folded, glued, and printed before production starts. It helps designers prepare artwork correctly and helps manufacturers produce packaging accurately.
Understanding what is a dieline in packaging & print can help you avoid design mistakes, improve communication with suppliers, and make your packaging project run more smoothly. This guide explains what a dieline is, why it matters, how to read it, how it is created, and how it connects to the die-cutting process.
What Is a Dieline?
A dieline is a packaging blueprint shown in flat form. It outlines the exact layout of a box or printed package before it is folded into its final shape. It shows where the material will be cut, where it will fold, and where key artwork should be placed.
By using a packaging dieline, designers can see all sides of the box in one view and make sure logos, images, and text are positioned correctly. This is especially useful for custom packaging boxes that need both strong structure and clean branding.
In simple terms, the dieline is the technical plan that turns a packaging idea into a production-ready file.
Why Dielines Are Important
Dielines are important because they support every major stage of packaging design and production. They help teams visualize the final box, check for errors, prepare prototypes, and move into mass production with fewer problems.
Error Detection and Proofing
A dieline allows designers and manufacturers to review layout, dimensions, and artwork placement before printing. This helps catch problems early, such as text being too close to the edge or graphics crossing fold lines poorly.
Visualizing the Final Packaging
Once the dieline is ready, it can be used in 3D software to preview the final package. This makes it easier to check structure, appearance, and practical details before sampling.
Die Cutting and Prototyping
Dielines are also used to create the die board for production. Before mass production, a sample based on the dieline should be reviewed to confirm that both structure and design work as expected.
Dieline Examples
Different packaging styles use different dielines. A folding carton dieline usually shows connected panels, fold lines, and glue tabs. A corrugated mailer box dieline often includes locking flaps and larger panels for shipping strength. A rigid box project may use dielines for wrap paper and structural parts rather than a single folded sheet.
For e-commerce packaging, a mailer box dieline needs to confirm locking flaps, fold lines, inside printing area and corrugated flute direction. For custom sizes and printed structures, visit our custom mailer boxes page.
Looking at examples helps buyers and designers understand how flat layouts turn into real packaging. It also shows why artwork cannot simply be copied from one box style to another without adjustment.
For premium formats such as custom perfume boxes, correct panel balance and layout accuracy are especially important.
How to Read Dielines
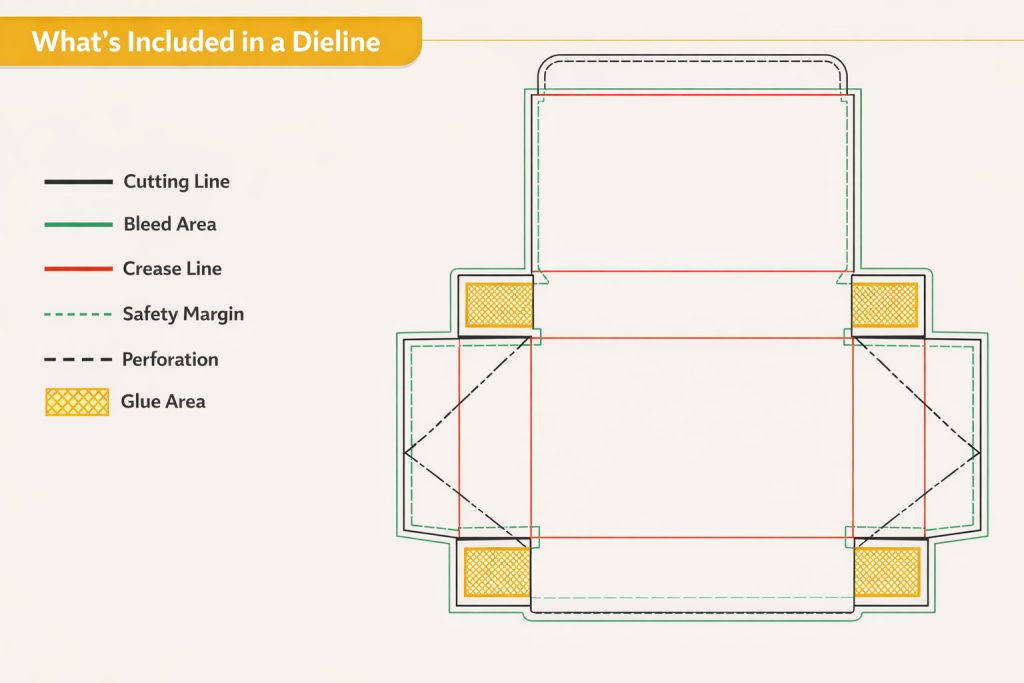
A dieline becomes much easier to understand once you know the main line types and what each one does. In packaging and print, a dieline is not just a flat drawing—it is the technical guide that shows how the package will be cut, folded, assembled, and printed. The most common elements include cut lines, bleed lines, fold lines, safety lines, perforation lines, and glue tabs.
Cut Lines
Cut lines, also called trim lines, show where the material will be cut into its final shape. These lines define the outer edges of the finished packaging. If the cut line is wrong, the final box size and structure will also be wrong.
Bleed Lines
Bleed lines mark the extra print area beyond the cut line. This extra space helps prevent unwanted white edges if the material shifts slightly during cutting. Background colors, patterns, and large images should usually extend to the bleed line.
Fold Lines
Fold lines, also called crease lines, show where the package will be folded to form its final 3D shape. These lines are important because they affect both structure and appearance. Designers should avoid placing important text or detailed graphics directly across fold areas when possible.
Safety Lines
Safety lines mark the safe zone where important content such as logos, product names, and text should stay. Keeping these elements inside the safety line reduces the risk of them being cut off during trimming.
Perforation Lines
Perforation lines indicate where the package can be torn, punched, or separated more easily. These are often used for tear-open packaging, removable sections, or special opening features.
Glue Tabs
Glue tabs show where adhesive is applied during box assembly. These areas are necessary for holding the structure together, so important graphics or text should not be placed there.
When reviewing a packaging dieline, make sure text stays inside the safe zone, background artwork extends to the bleed, and key design elements are positioned carefully around fold lines and glue tabs. A clear understanding of these markers helps reduce production errors and leads to better final packaging results.
For skincare bottles, makeup sets and beauty gift packaging, dieline accuracy affects bottle fit, insert position and printed brand details. Yingye Packaging manufactures custom cosmetic packaging boxes with custom size, printing, inserts and finishes.
How to Create Dielines
In most cases, the dieline is created by a packaging designer or manufacturer. Still, it helps buyers understand the process so they can review files with more confidence.
Use Structural Design Software
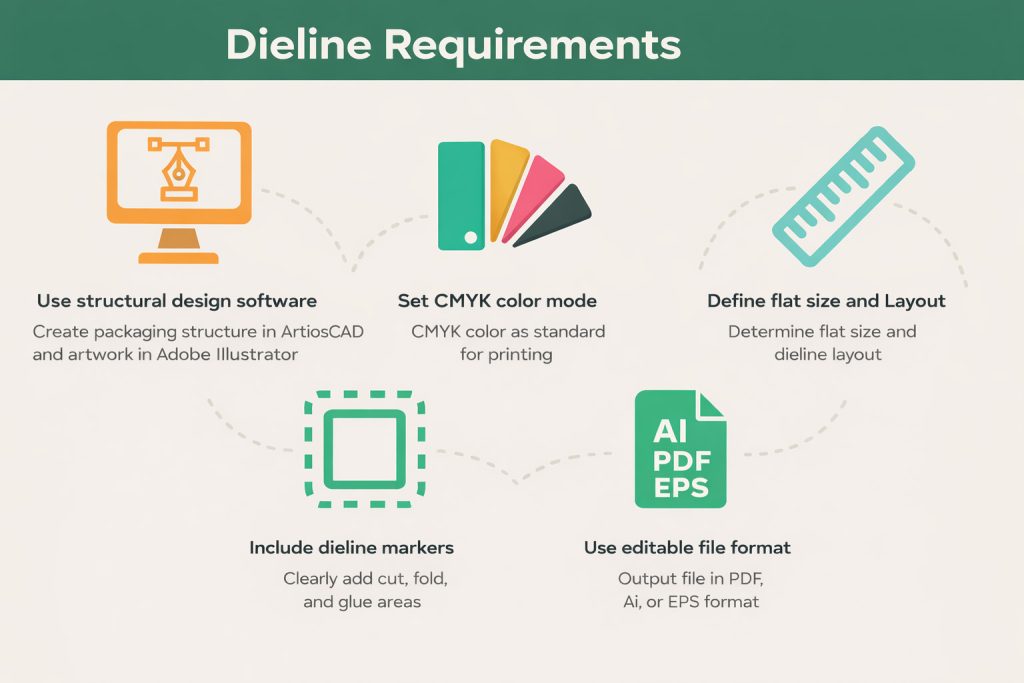
Professional software such as ArtiosCAD is commonly used to create accurate dielines for packaging production. Adobe Illustrator is usually better for applying artwork, while tools like Pacdora can help with templates and mockups.
Define the Flat Size and Layout
The size and structure of the box need to be confirmed before the dieline is finalized. Providing a sample box or reference structure can make this step easier.
Include Dieline Markers
Cut, fold, and glue areas must be clearly labeled so the production team can manufacture the package correctly.
What Buyers Should Check Before Approving a Dieline
Before approving a dieline for custom packaging, check more than the outer shape. Product size, insert position, artwork placement and folding direction all affect the final box.
Review these points before sampling:
- Inner box size and product fit
- Bleed area for background colors or patterns
- Safe area for logos, text and barcodes
- Fold lines and opening direction
- Glue tabs and areas that should not contain important artwork
- Insert position for bottles, jars, electronics or gift sets
- Material thickness and production tolerance
- Shipping and packing requirements
Factory advice: do not approve a dieline only from a flat PDF. For rigid boxes, magnetic boxes, drawer boxes or mailer boxes, a physical sample helps confirm structure, insert fit and opening experience before bulk production.
Output Format
The final file should usually be saved in editable vector format such as AI or PDF, with CMYK color mode for print production.
For detail step-by-step process of preparing artwork, read our guide here.
The Die-Cutting Process
Once the dieline is approved and the artwork is printed, the packaging moves into die cutting. Manufacturers use the approved dieline to create a custom die board. The die-cutting machine then cuts the material into the exact shape defined by the dieline.
In simple terms, the dieline is the plan, and die cutting is the process that turns that plan into a physical packaging structure.
This is especially important for packaging that depends on precise construction, such as rigid magnetic gift boxes and other high-end custom packaging.
To learn more about the die-cutting process, read this article that guides you through the details.
Need Help Creating Dieline?
You do not need to create a dieline yourself to understand its value. If you are a brand owner or buyer, knowing the basics helps you review files better and communicate more clearly with your supplier.
For more complex projects, it is often best to work with an experienced packaging manufacturer that can support structural design, artwork checking, mockups, and sampling. This reduces mistakes and saves time, especially for premium or custom packaging projects.
If you do not have a ready dieline, our team can recommend a suitable structure through our custom packaging solutions before preparing a sample.
Conclusion
A dieline is one of the most important parts of packaging design and print production. It shows how packaging will be cut, folded, glued, and printed before manufacturing begins. It also helps with proofing, 3D visualization, die cutting, and prototyping.
If you want your packaging to look right and function well, understanding what is a dieline in packaging & print is a smart place to start. A clear dieline leads to better communication, fewer errors, and more professional packaging results.